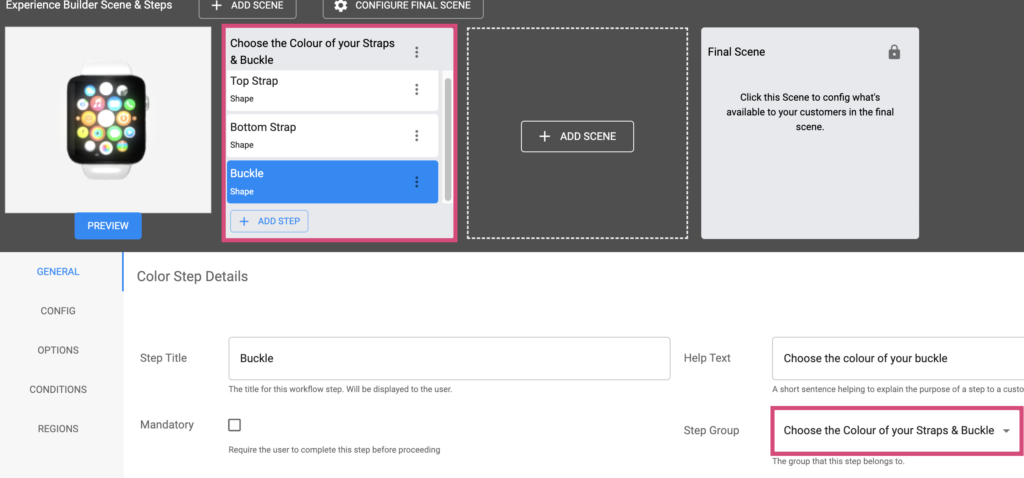
This is where we edit the basic settings for our steps, along with some helpful toggles.
1. Step Title
First, we can edit the name of the step, the Step Title, which is helpful for presenting to the consumer exactly what they are changing. For example, suppose you want them to add their name in a text step. In that case, you’d title the step “Add your name”, or, choosing the size of a product in a Question Step, you might title it “Choose your Size”, or “Bottle Size”, “Package Size” etc. and it’ll display like this to the consumer in their personalisation journey.

2. Help text
Next, we can add “Help Text”. this provides a way for you to briefly explain the purpose of this step, where the title doesn’t cover the exact information you want to express. See Below, this is how Help Text can be displayed with a step titled “What’s Style of Vest is this going to be?”, the help text below explains key information about this step to the consumer.

3. Mandatory Toggle
Next, we can decide whether our step is “Mandatory” or not. With the Mandatory toggle, we can decide whether the step is essential to the overall order or not. For things like choosing sizes or adding/removing extras or addon pieces, this will be an essential setting. The consumer won’t be able to proceed with the workflow unless they’ve made a selection or added to the steps that have this mandatory setting enabled, a notification style piece will appear to them in the corner of their preview to let them know. See the below example, a consumer is personalising an engraved knife with a monogram, they haven’t entered any information, so they can’t proceed unless they add one, since they chose the monogram style of this product beforehand.

4. Step Group
In the General Settings tab, we can also manually choose which “Step Group”, or “Scene” this step belongs to, though the step can also be moved and ordered between scenes by clicking, holding, and dragging them where you need.

Scenes serve as a way to group and organize our steps in a way that makes sense, this is helpful for complex workflows that have a range of different steps that’s hard to keep track of. Scenes will also display the steps you’ve added in your front-end product experience in the same order and position that you set in the workflow editor. For more information on Scenes, click here.
