In order to receive print files on your desktop devices from Spiff, we need only follow a few simple procedures.
With the Spiff Print Service app, users of our software can completely automate their Print/fulfillment experience. Print either on demand, or print automatically without any of the hassles of manual work post installation. Autoprint, Product specific print folders, Print settings, Quantities and more are all available with #SPIFF.
System Requirements for devices:
Operating System: Windows 7+ (With exceptions, some previous versions *may* work).
Memory: 4GB – 8GB> RAM.
Storage: 10-20 GB available storage space.
Optional: A printer that is installed with a working print driver, if printing from the device using the app.
1. Installing Spiff Print Service App
- Download the print gui 3.3
- Open in explorer and run print_gui_3.3 as administrator.
- Click next to install the Print Service App, making sure all prerequisites are enabled to install the service correctly.
When the machine is attached to a domain, ensure that both Ghostscript and the Spiff Print Service are installed on the same domain account using the app.

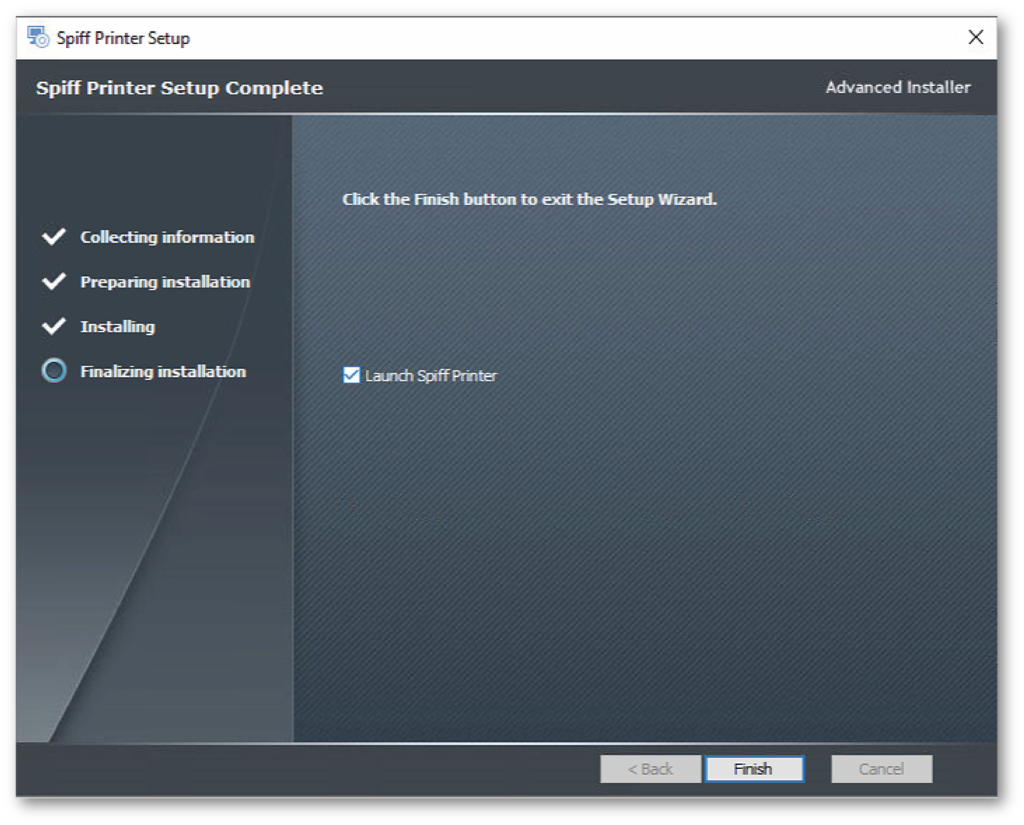
4. Click Install to begin the installation process.
5. When the installation is complete, check the box to open the Spiff Printer service agent and click finish. Installation Complete!
2. Initial Configurations for Spiff Print Service.
1. The Spiff interface will now load. You now need to enter your initial configurations to get the ball rolling.
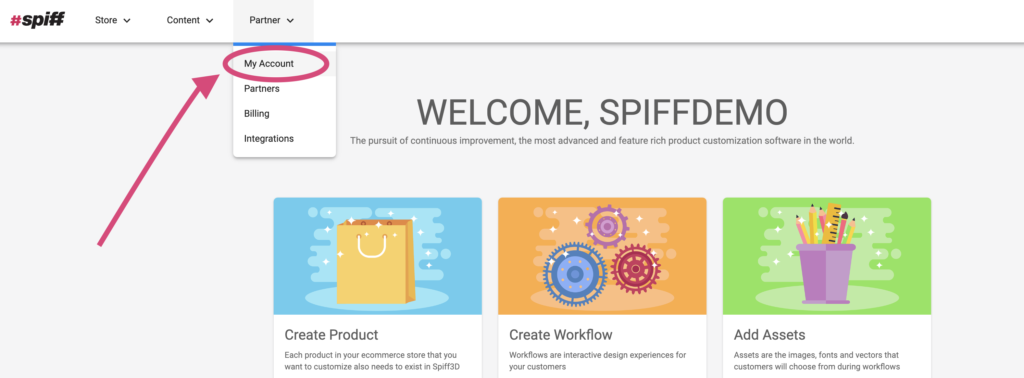
First, starting with General Settings in the Spiff Print Service app, we need to add create/Add a Location ID.
– Navigate to the Spiff Hub online, login and go through to the Partner tab, then My Account.
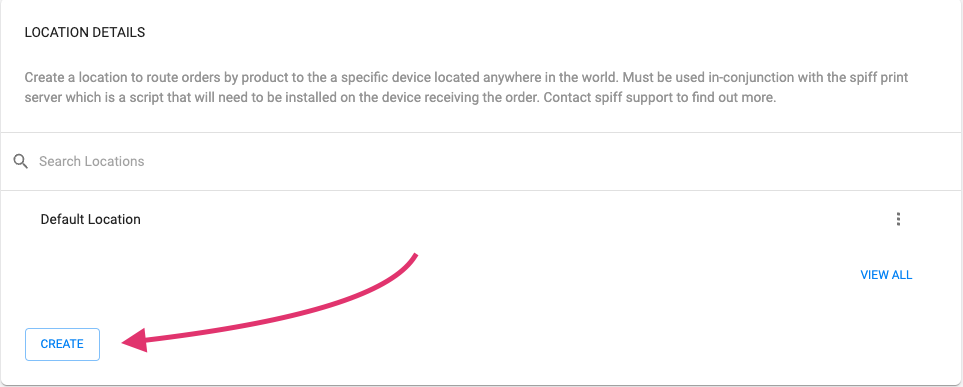
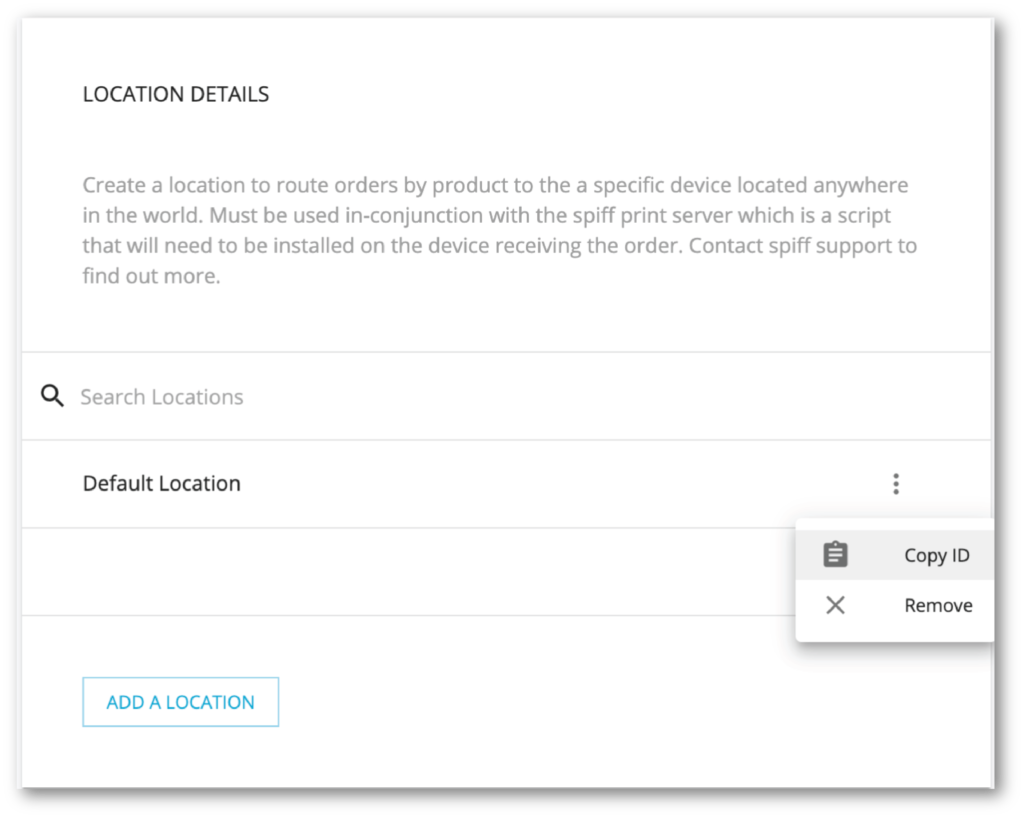
Scroll down to “Location Details.”
2. “Default Location” comes standard with all new accounts, you can use this if you are only going to have one printer/location.
We recommend you Create a location with your own information and name to make things more clear for future reference.
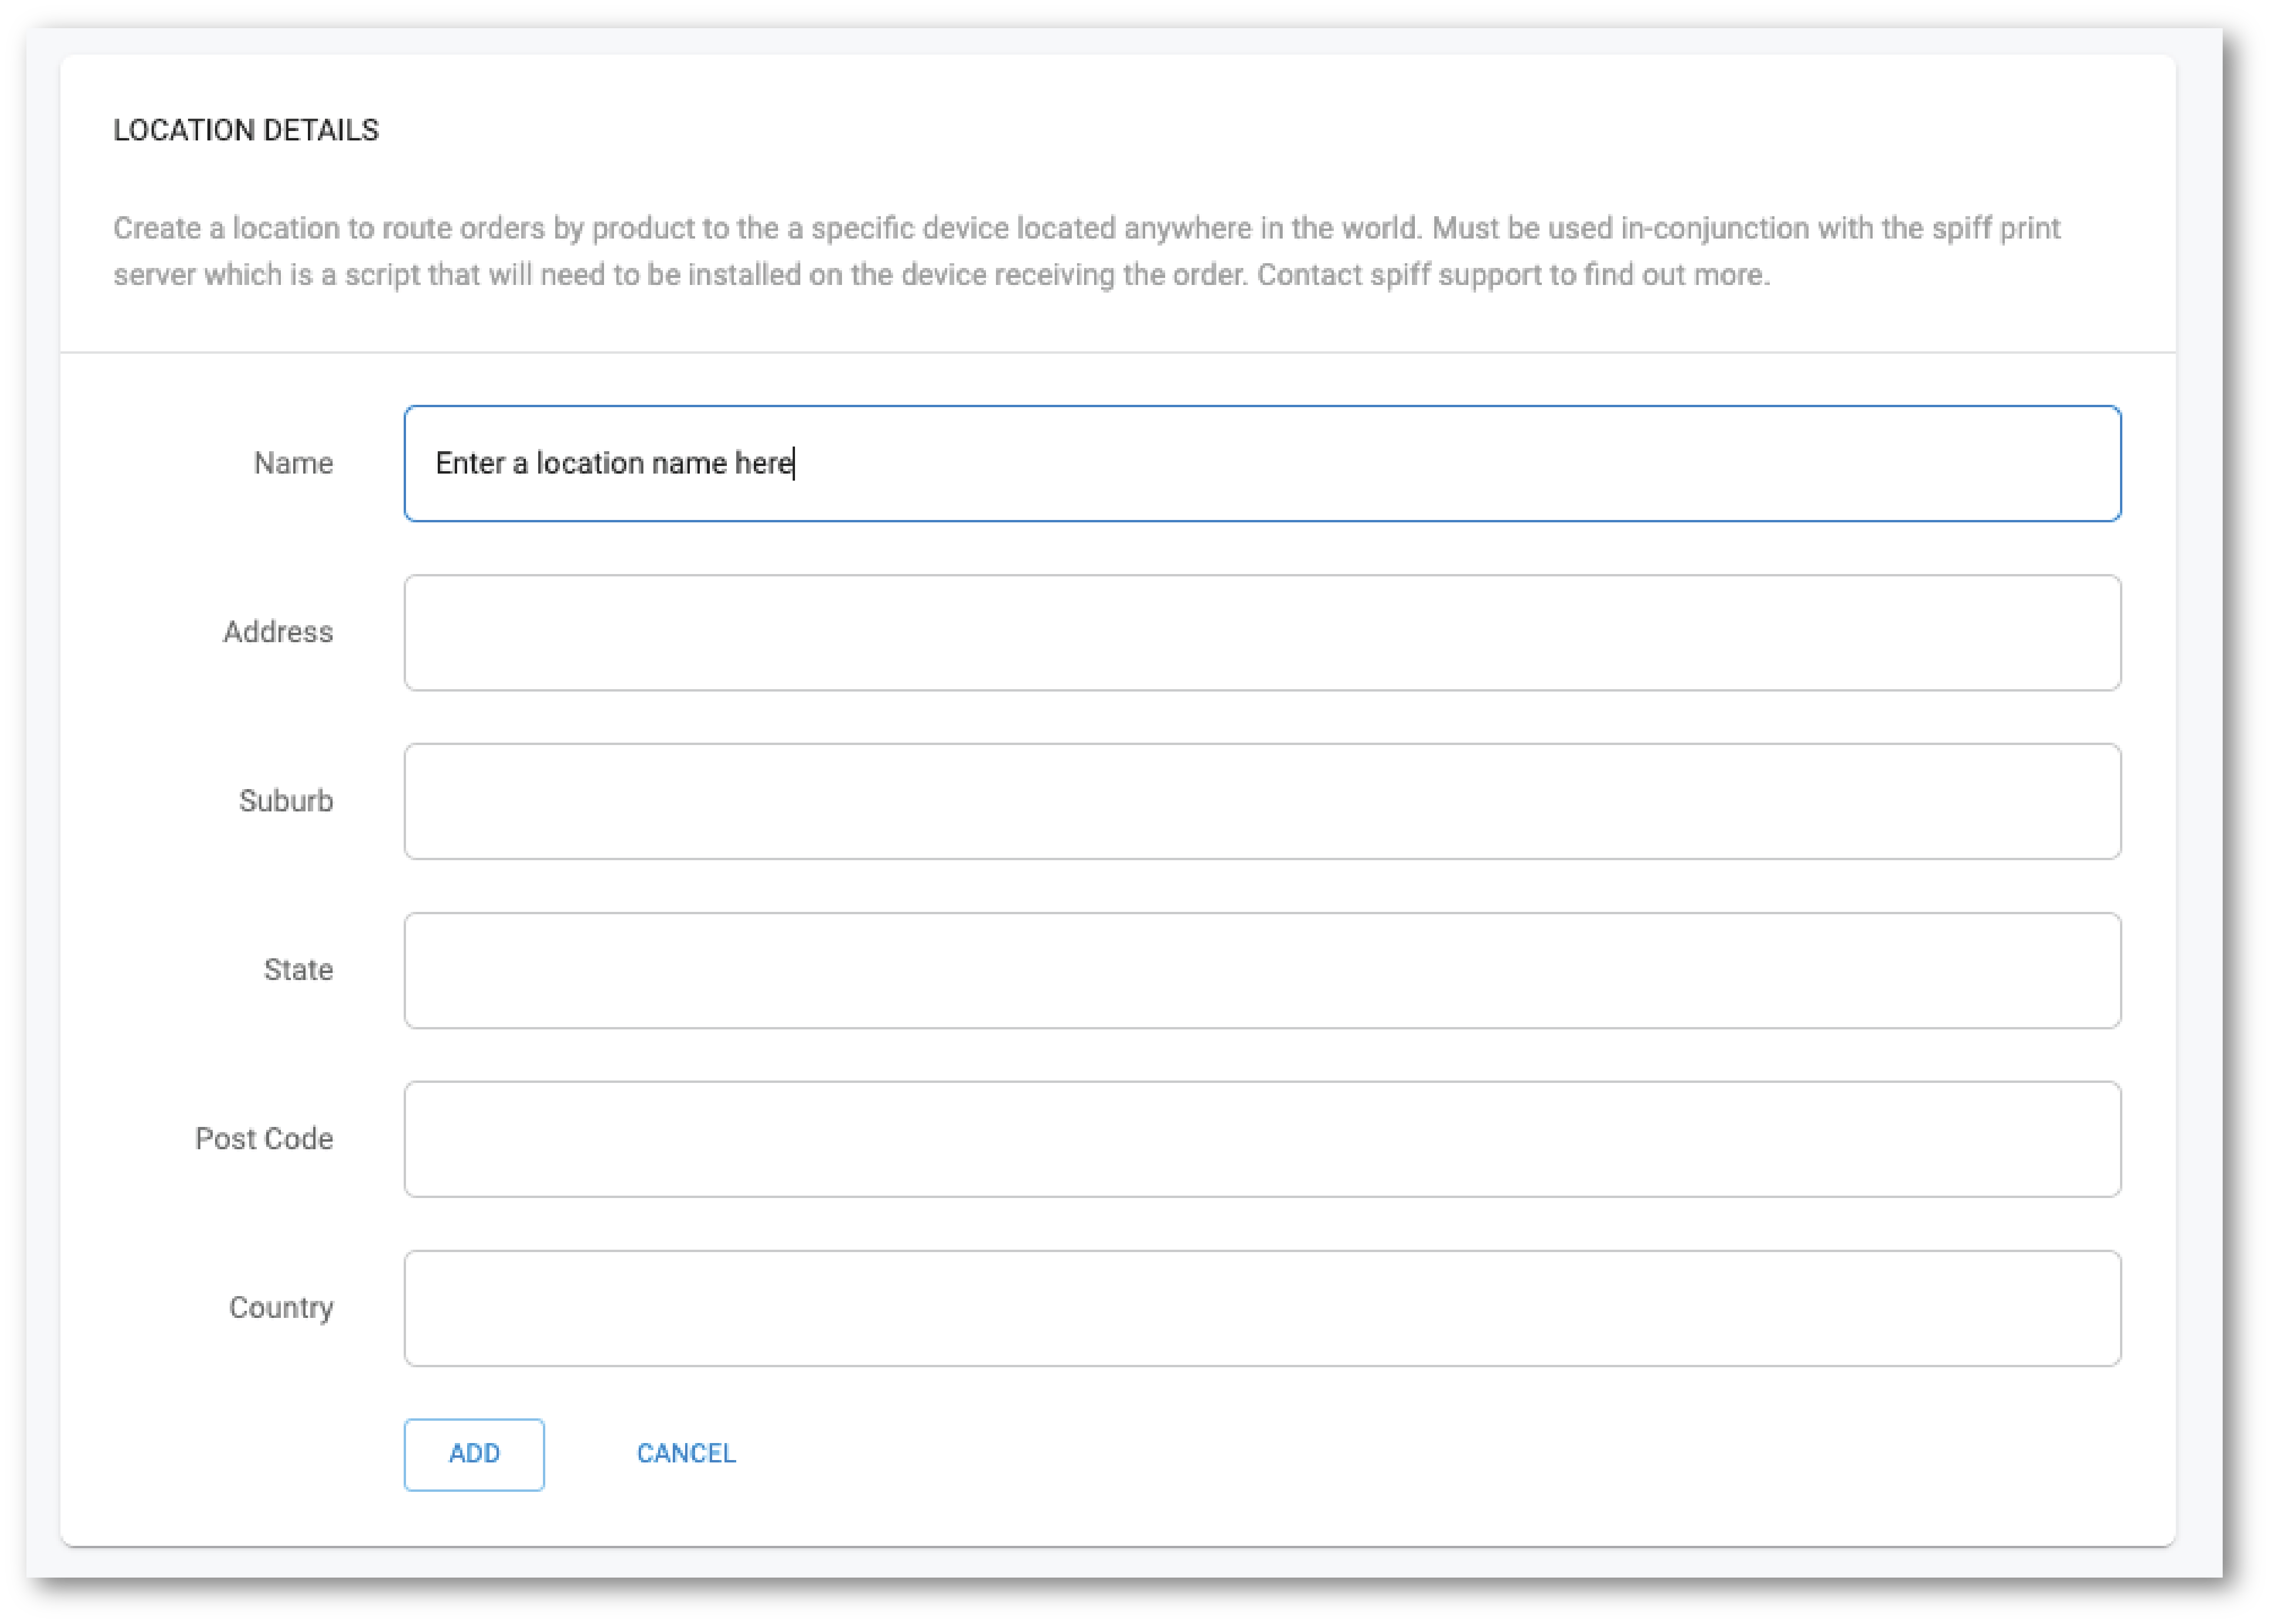
3. Add a Name for your location and use the “Add” Button at the bottom to add the new delivery location to your account.
Locations can be can be named anything relevant to you, “Office Printer”, “Warehouse”, “Melbourne Store” etc. and can link to any folder on any desktop/device that has the Spiff Print Service installed. The other information like address is for your own clarity and observation – important if you have many printing locations.
4. Once you have added your location, click the 3 dots on the right and choose Copy ID.
With this new location ID copied, you can add/paste the Location ID into the appropriate section on the Spiff Print Service app. – see step below
Make sure to hit save once you’ve added your new location!
5. Going back to the Spiff Print Service app on your machine, navigate to general settings – you can now enter/paste the copied Location ID from your account on Spiff Hub, and then hit save at the bottom to finalise.
You will need to remove any hyphens from the copied location. For example, “7449387e-82bb-4f11-9245-3153b02fd069” may be the copied ID, needs to be “7449387e82bb4f192453153b02fd069” – No hyphens or spaces.
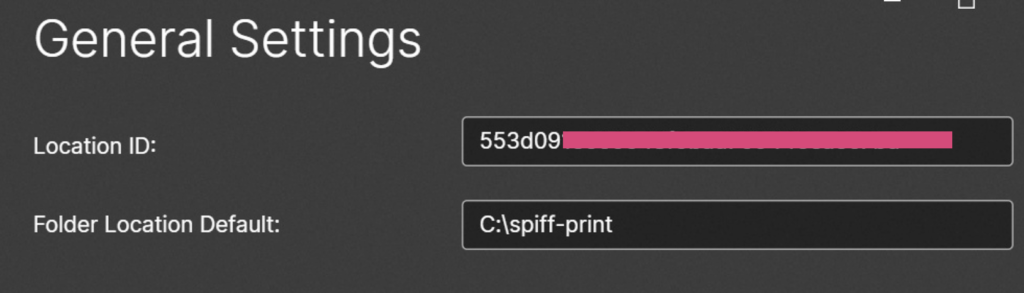
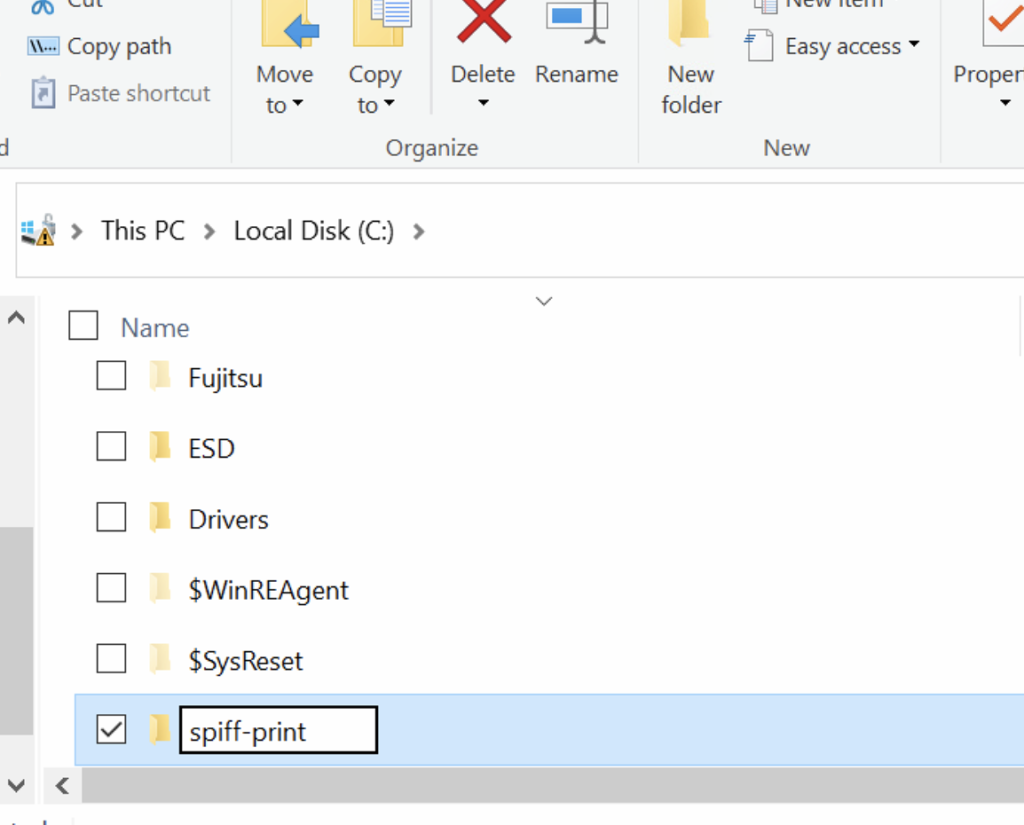
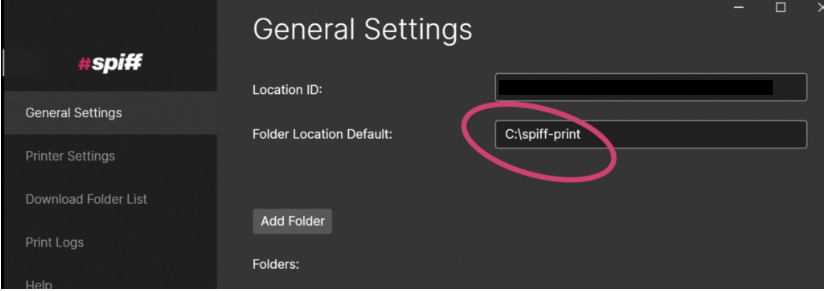
6. In explorer, on your machine, create a folder in an appropriate location. Then, in the Spiff Print Service app, navigate to General Settings and set the “Folder Location Default” as the filepath of the folder you’ve just created. Hit save to finalise.
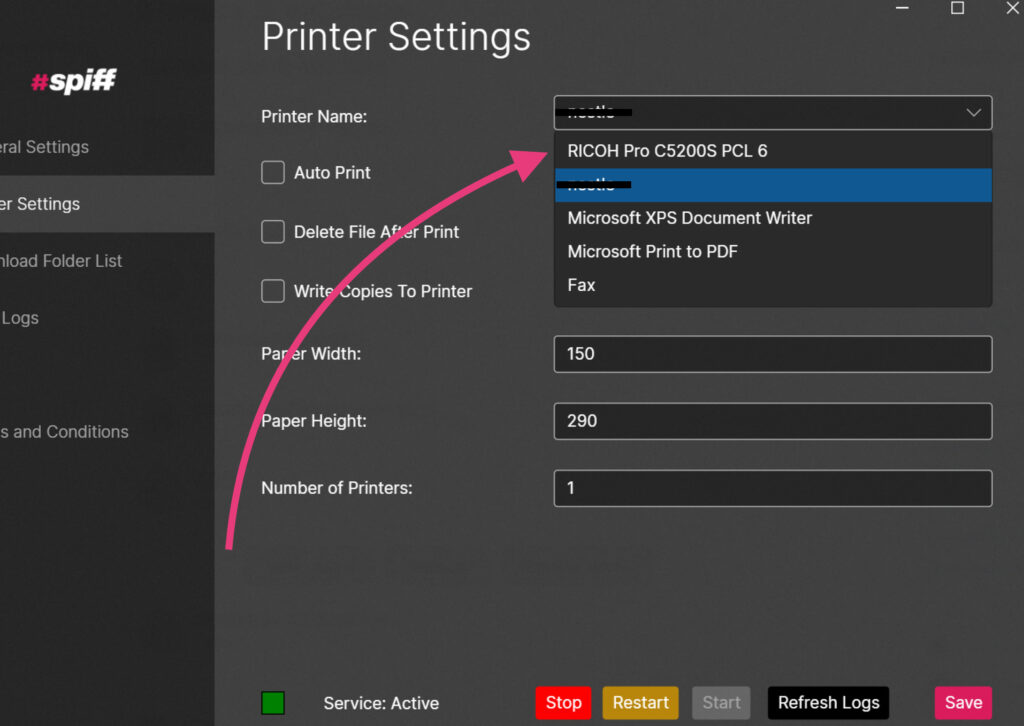
7. Now you can navigate to the “Printer Settings” tab in the Spiff Print Service app. In here, you now choose the printer you’d like to run your operation. Click the arrow prompt and select from the list, hit save at the bottom to finalise.
You’re now ready! Any orders processed through your store now will have your specified print data and information delivered/routed through to your specified folder, ready to access and print as you need!
Without Autoprint enabled, files will be only be delivered to the folder you set without automatically printing, you will need to manually print each item received. Follow the steps in Section 3 “Setting up Autoprint” below to enable and configure this feature.
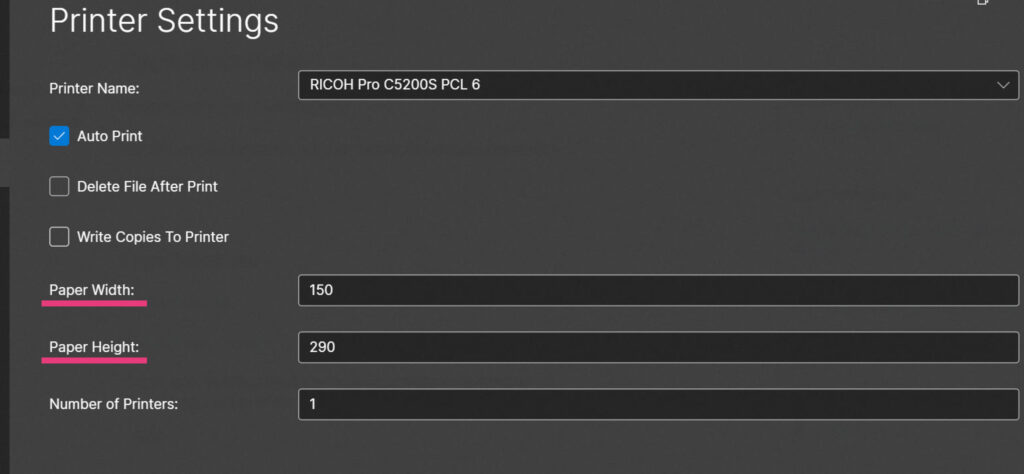
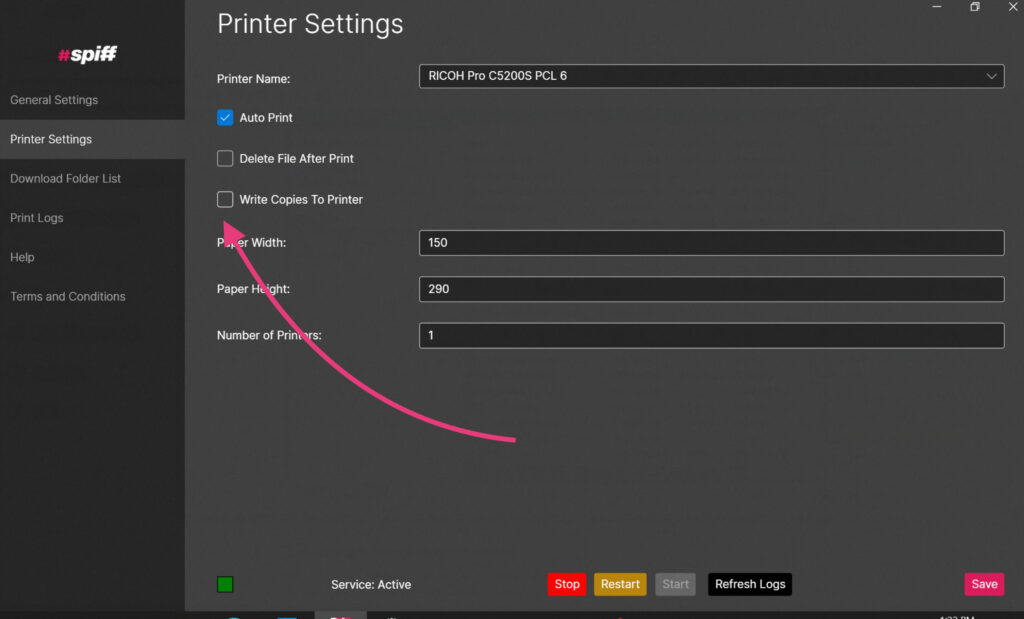
8. To finish, still on the “Printer Settings” tab, you can enter the “height” and “width” of your printer’s stock/paper.
Eg. we are using a label/sticker sheet in our example machine, the height/width of our print stock is 290h x 150w, so we enter that in to our printer settings. When we finally print our files, this information will be passed along and we won’t need to change any print settings when we queue up our files!
3. Setting up Autoprint
In conjunction with product settings in the Spiff Hub, utilizing our Autoprint feature allows you to automatically route order information and print data through to your appropriate devices/machines and print immediately without the hassle of manually going through and printing each individual file.
In order to get this working correctly on your device/machine, there’s a few steps we need to take.
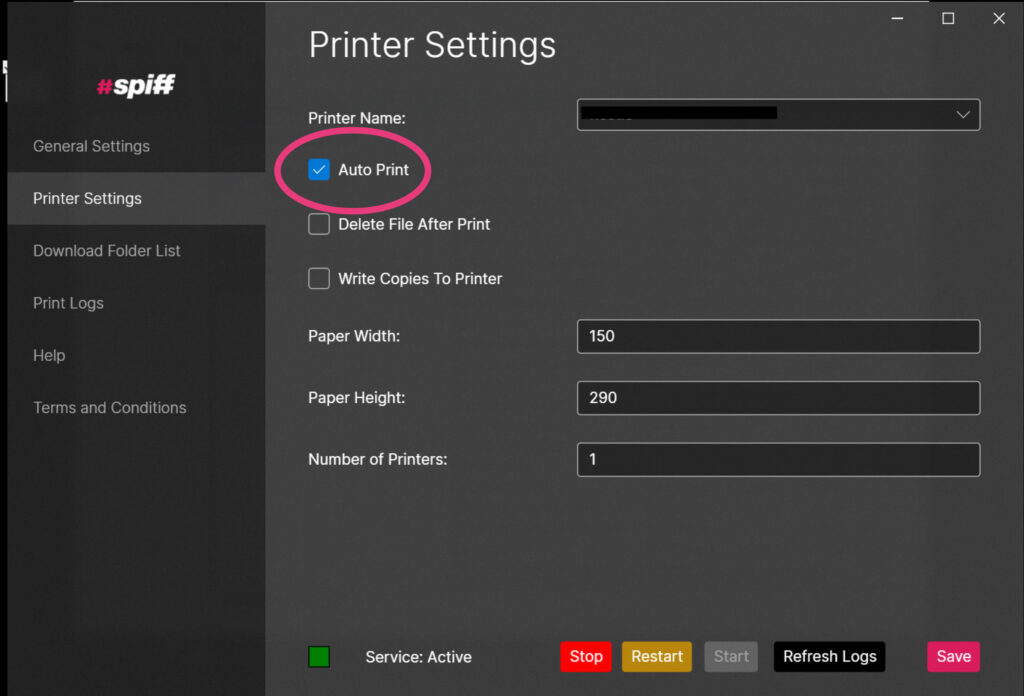
1. First, in the Spiff Print Service app, navigate to Printer Settings and enable the Auto Print feature via the checkbox.
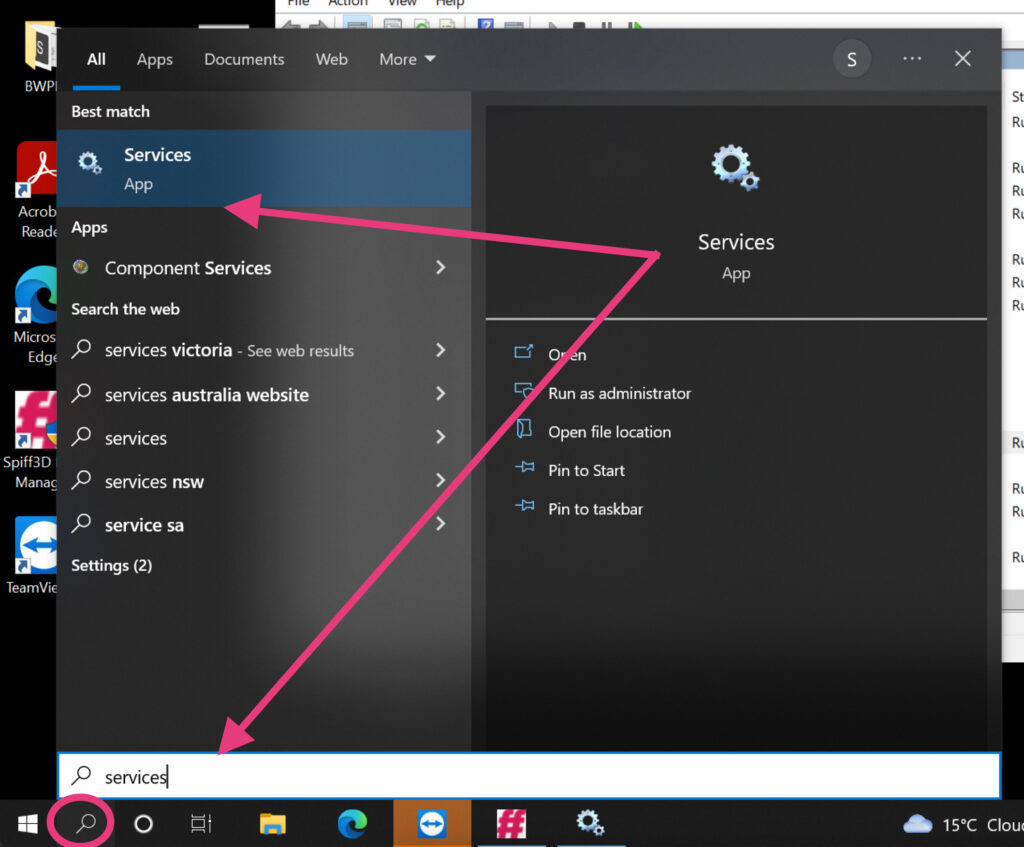
2. After this, we need to give the Spiff Print Service permission to launch the print queue service on the machine, this allows Autoprint to work.
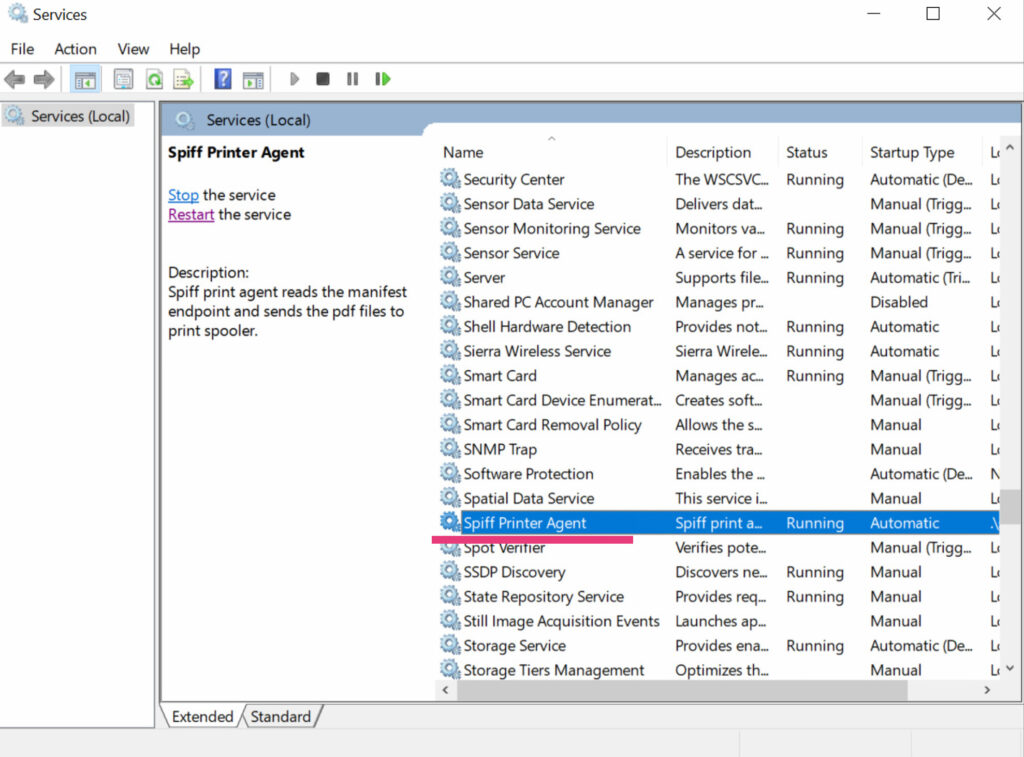
To do this, we need to navigate in Windows to the search box and find the “Services” app.
Once you are in the services app, scroll down or simply type in “spiff” to find the Spiff Printer Agent service. See below.
The autoprint feature requires a Local account on the machine with a local password, microsoft accounts with passwords online-only and non local to the machine may not work.
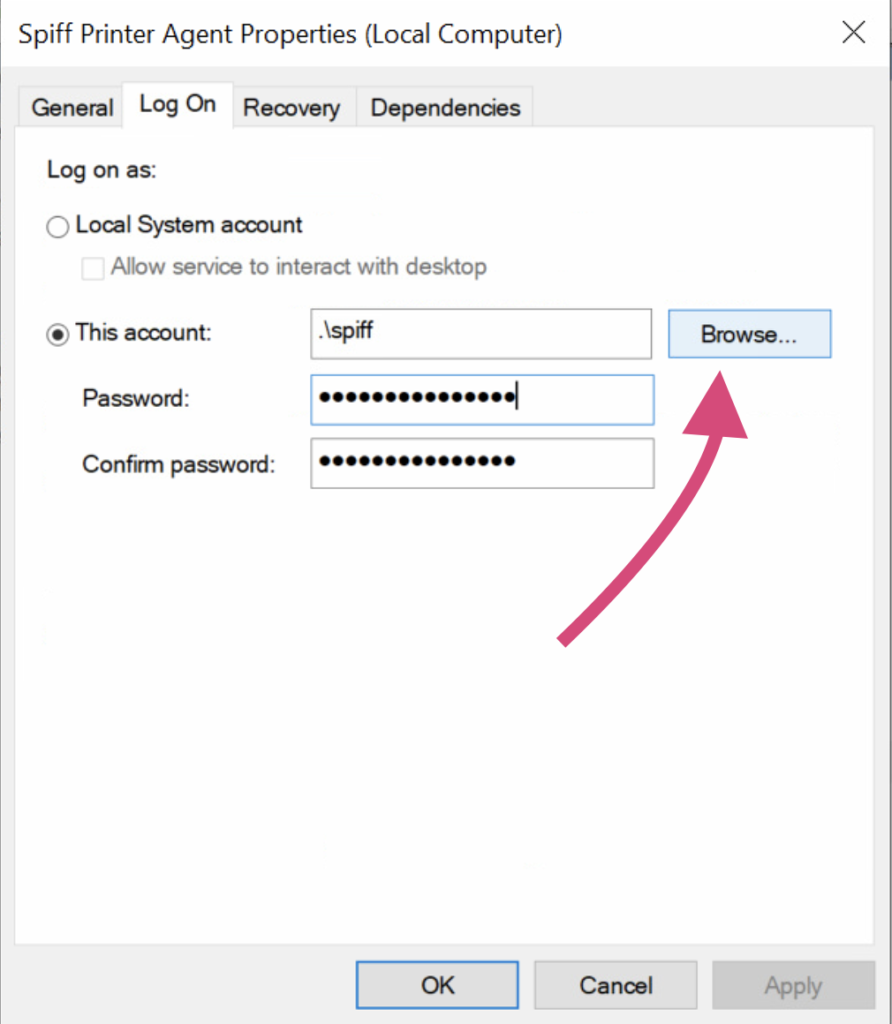
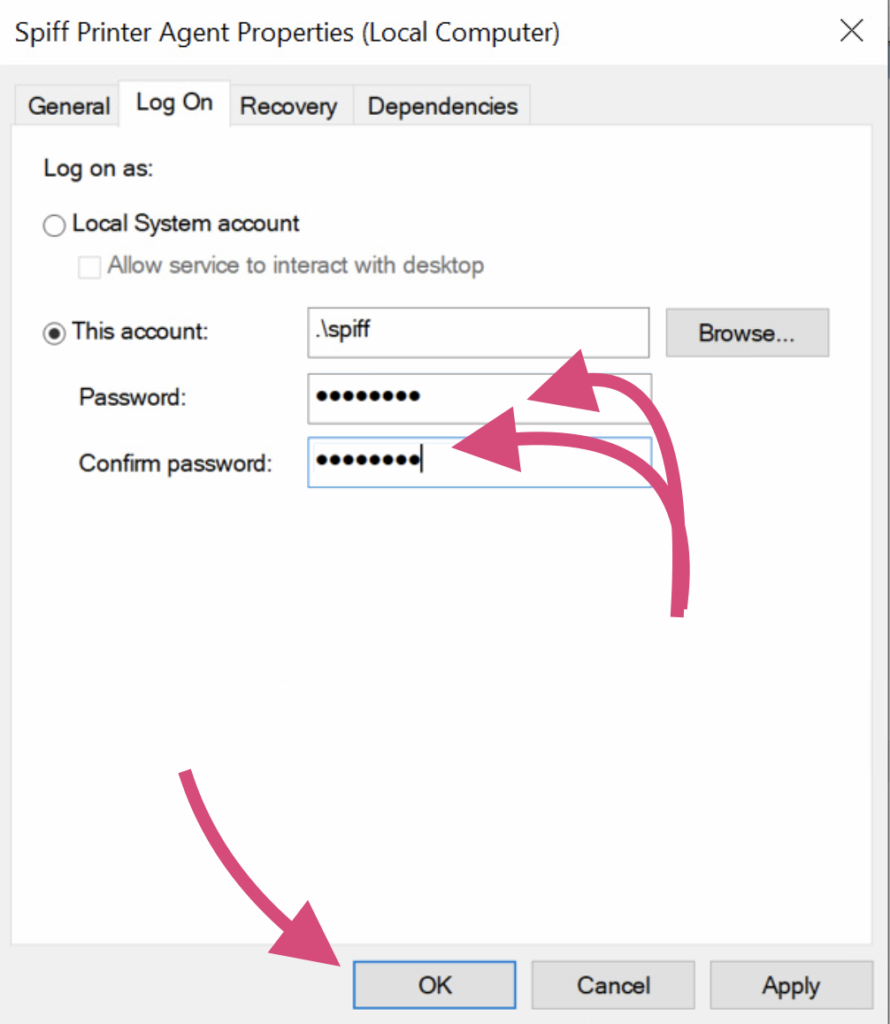
3. Within the Services settings page, we now need to add the current user details to the Spiff Printer Agent, in order to give permissions to handle the printers and queues.
We will use the “Browse” feature to find the appropriate information, once within the Browse setting, click on “Advanced” to access the further details. See below
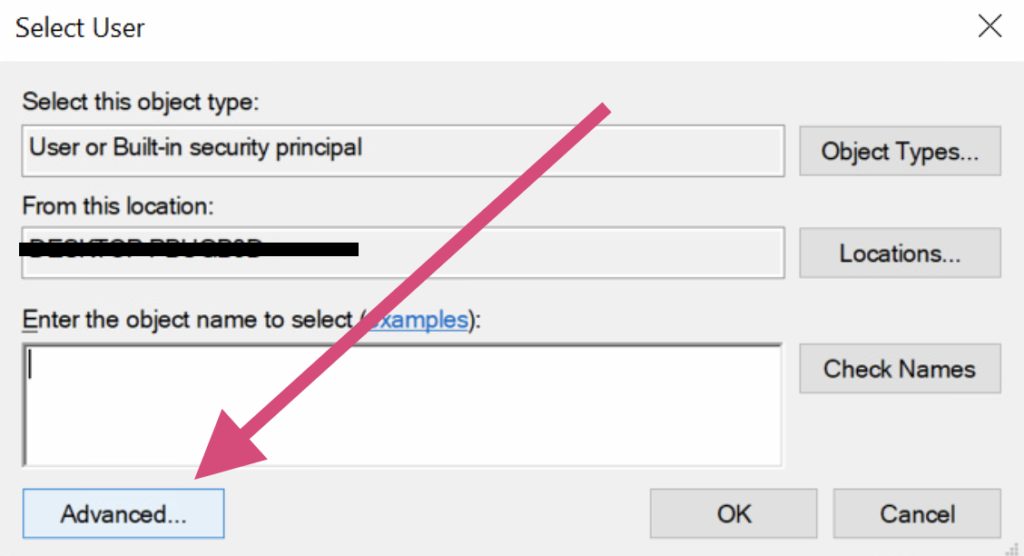
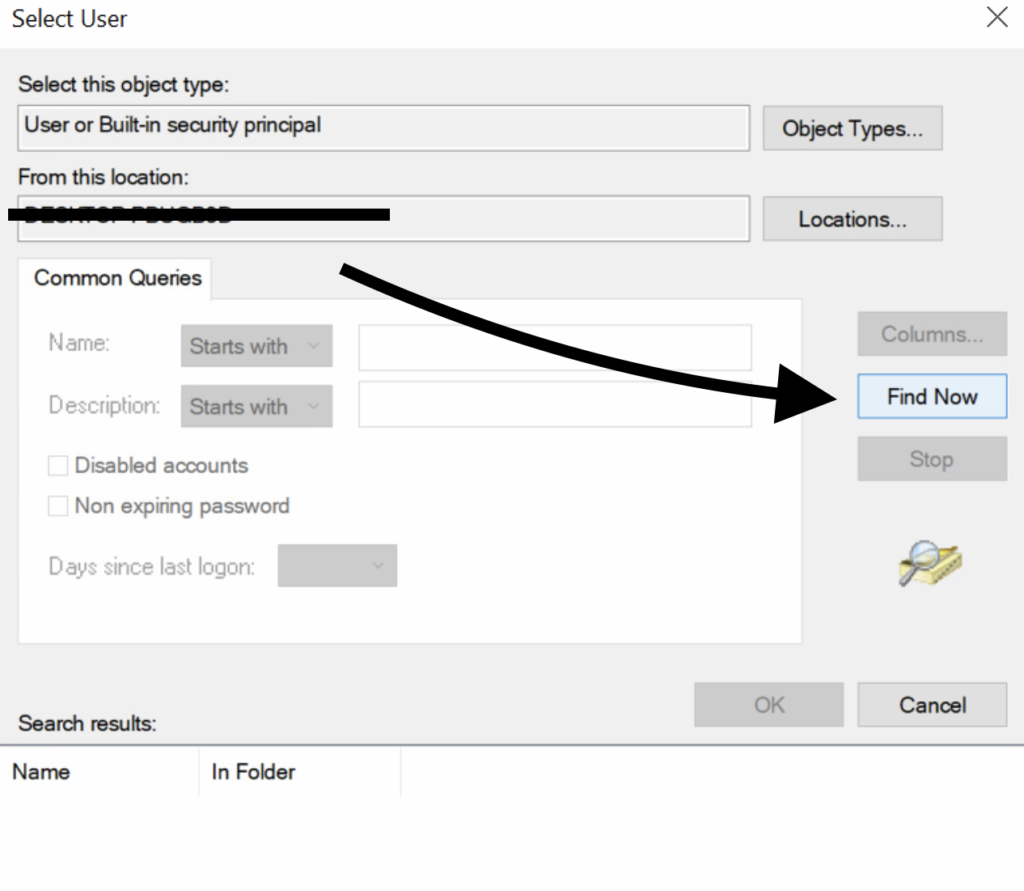
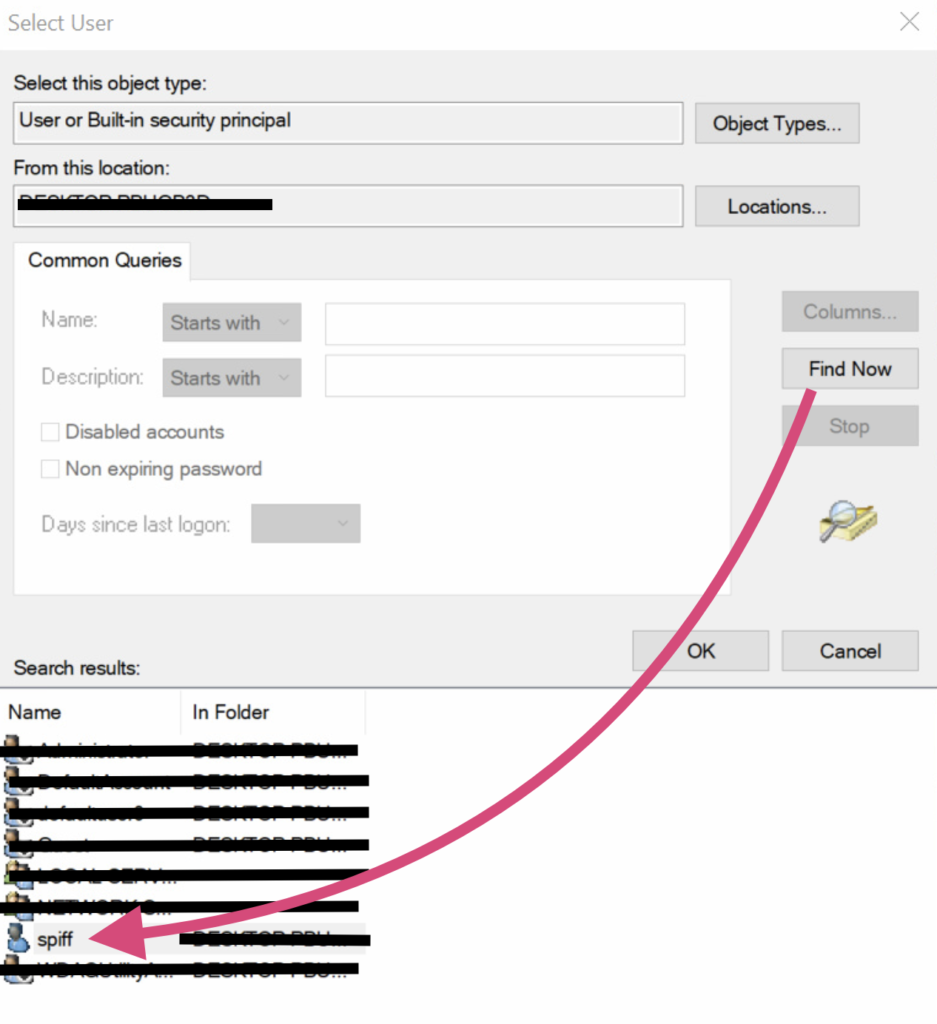
4. Now, within the advanced settings, use the “Find now” feature to populate the list of users, then click the associated user account that will use the Spiff Print Service autoprint feature. In this case, the account we are using on our machine is called “spiff”. See Below.
5. After double clicking on your account in the populated list, you will return to the previous screen. Now with your account added, you need to enter your password
You must have a password set on this account, without a password it may not function correctly, if at all.
If the local account you are using does not have a password, you must set one in order for this work.
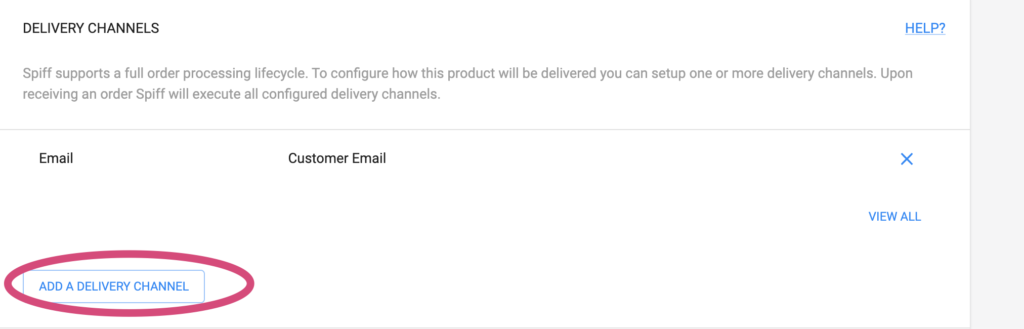
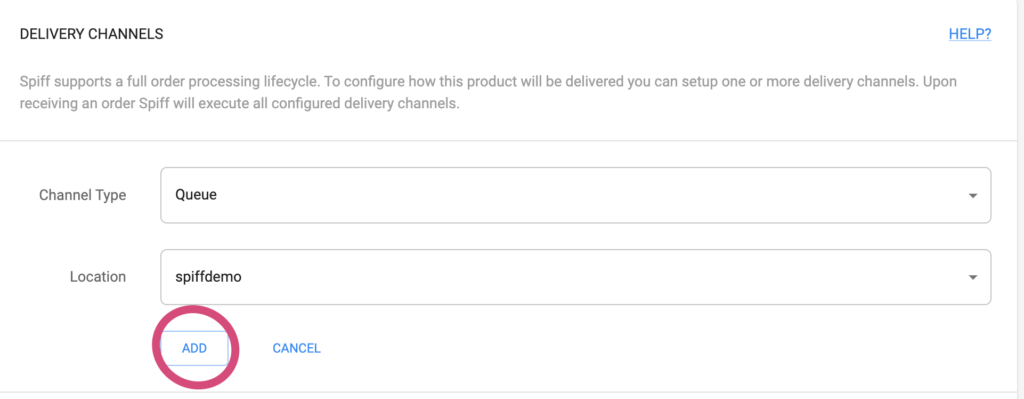
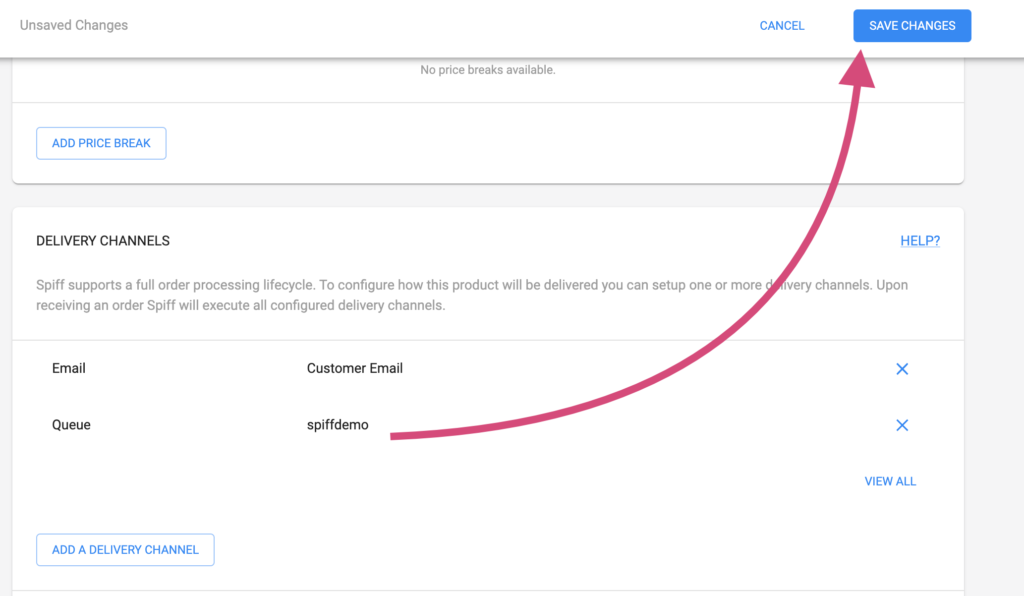
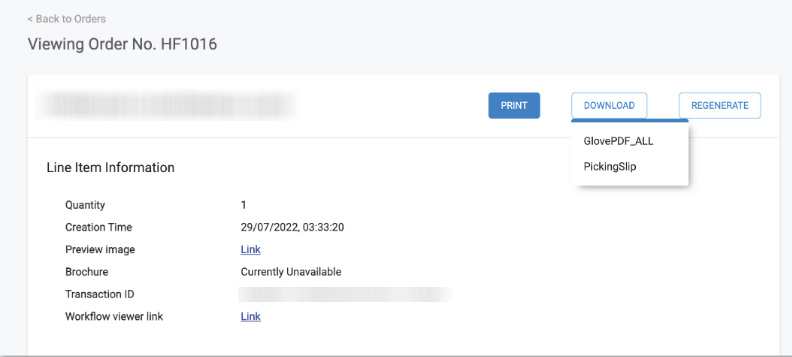
7. Navigate to your product, scroll down the page and add your new delivery channel to the desired product(s), then save your product. See the below screenshots.
8. The Autoprint feature is now connected!
You can now go to your Spiff Hub account and run an order internally to test the feature.
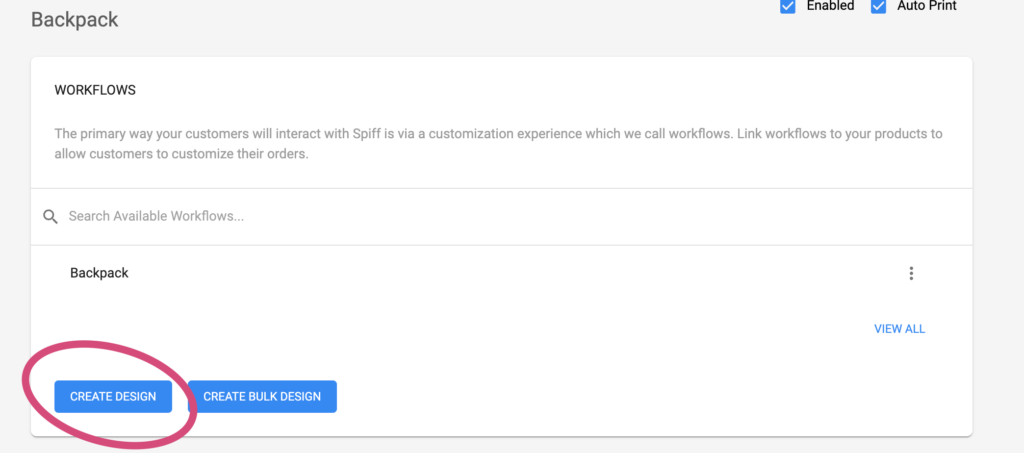
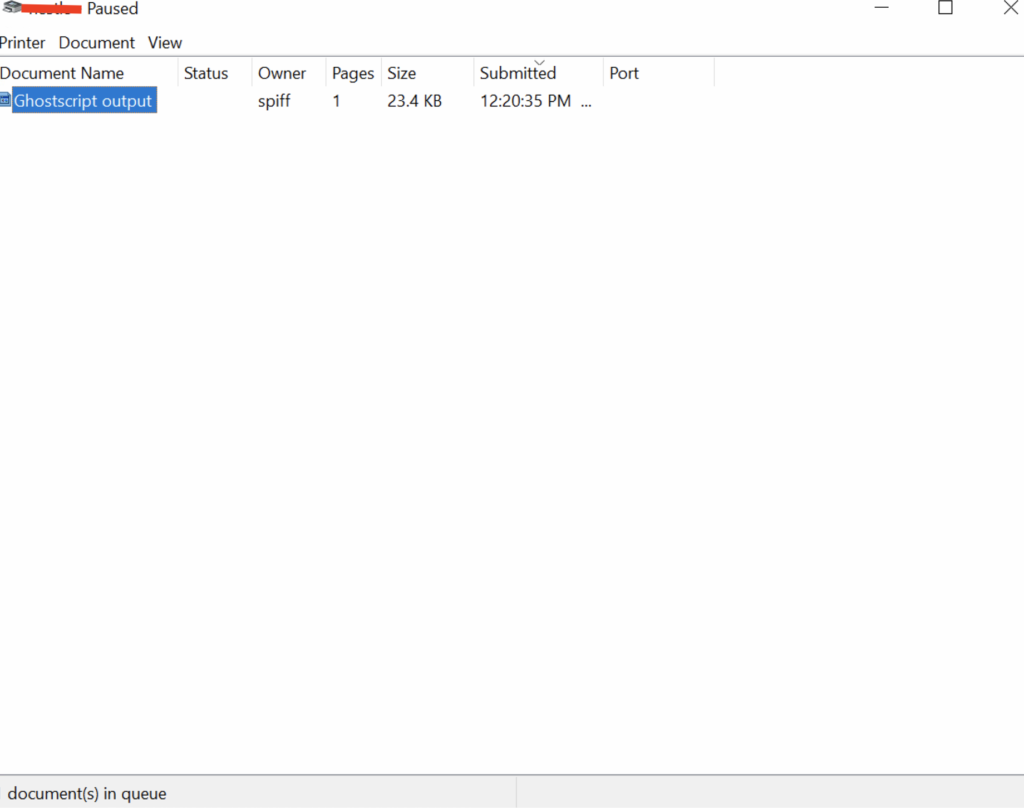
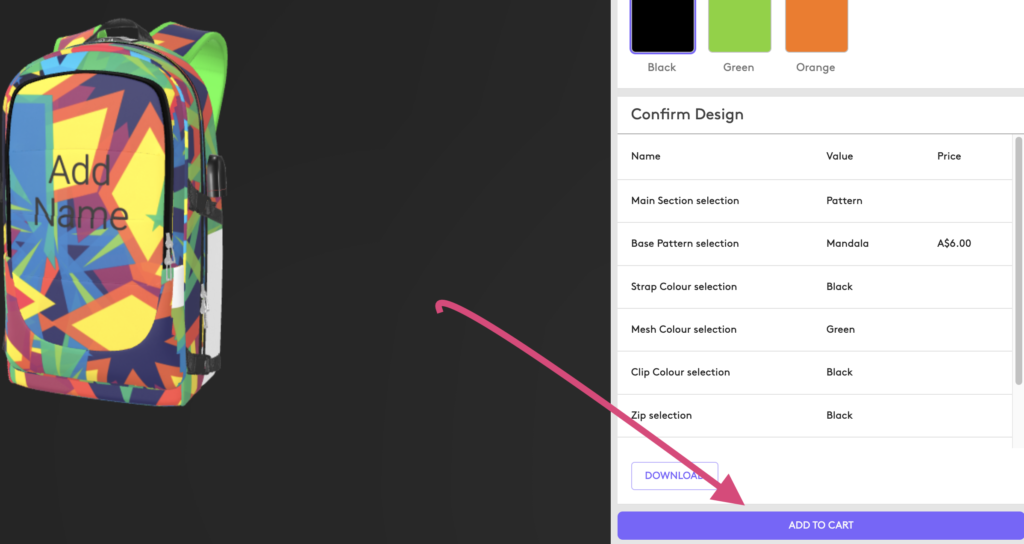
To see it work in real time, go to your device settings on your Windows machine, navigate to the Devices section>Printers & Scanners. and then click on your connected default printer. Click the button to open the Queue, have your printer turned on and ready, and then run an order through your now connected product on Spiff Hub. On your the product page (of the connected product), click “Create design.” ( if your product is setup already), go through your workflow, and finally hit “Add to cart” when finished. If you still have the print queue open, you’ll see the order come through and get sent to the printer.
Print Quantities/Print Repeats
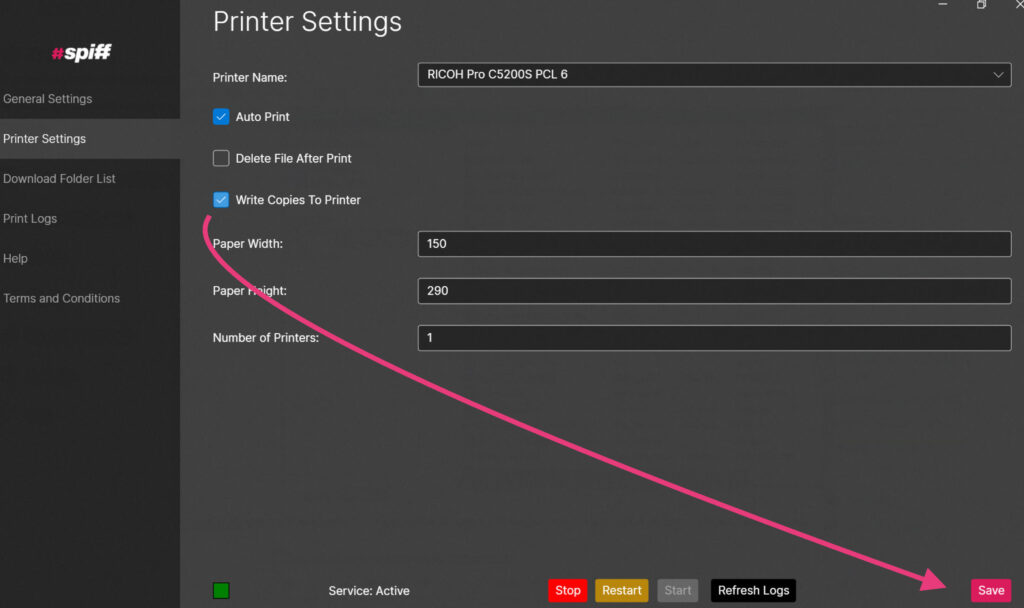
When a customer orders a product from your store, they may order varying quantities of the product. By default, Spiff generates a single PDF/Print file, and supplies this to the Device/Machine along with the quantity information. Without this setting enabled, only the one file will print, unless repeats have been manually set and embedded in the print file in the backend by a SPIFF representative. Note: Eg. A customer orders 20 wine bottles all with the same label design, with “Write Copies to Printer” enabled, the printer will receive the one PDF or Print file and queue it 20 times to print the desired quantity.
1. In the Spiff Print Service App, you can navigate to the “Printer Settings” tab and then enable the “Write Copies to Printer” setting in order for the quantity received to be queued to in the printer.
2. After enabling the “Write Copies to Printer”, You can now hit save and the Spiff Printer Service will now accept and print orders in the quantity defined by the amount the customer orders. (See the warning above for information on mandatory/set quantities before using this feature)
With more complex print-command-stations (Like Fiery Command WorkStation), the prints can be queued to only fire once a certain quantity is actually reached, and even impose them all onto 1 sheet of paper, if applicable. Eg. The set up Command Station will print once it has receive 20 files, the business prints multiple files onto the one sheet and only wants to fire the order once that sheet is full – so as to not waste any stock by having blank section printed.
Product/Rendition specific print folders
With the “Download Folder” feature in the Spiff Print Service App, you can choose specific print folders for specific products/product renditions. You can setup any number of folders and specify what print data/information goes where for each product specified. For example, you sell personalised Shoes, Jackets, and pants – you don’t want all of these print files clustered together in a single folder in an unorganised way. This feature allows complete control and organisation for where you receive files on your machine.
Smart folders can be setup too, with more complex print-command-stations (Like Fiery Command WorkStation), this can also print automatically from each folder. Spiff autoprint, however, will only print to the default printer set in the Spiff Print Service App, currently.
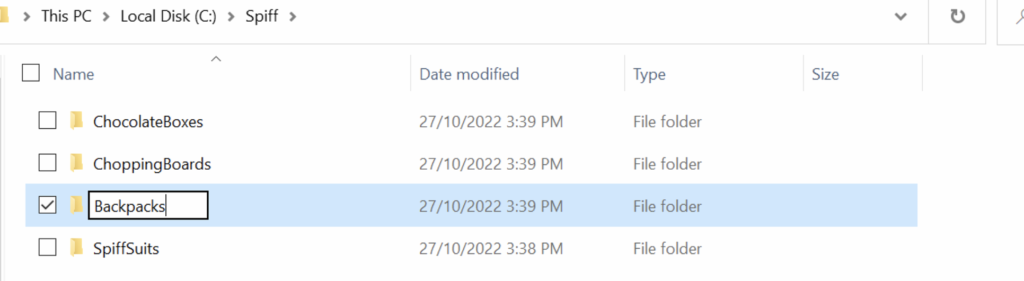
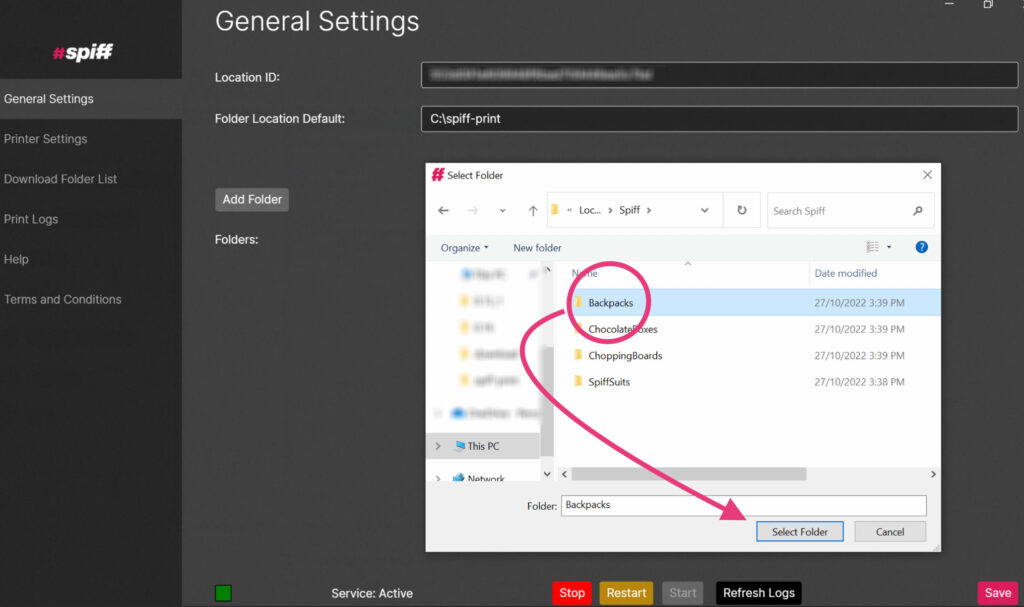
1. In order to set these up, you first must create the appropriate folders on your Windows machine in Explorer. In this example, we create a few different folders within our main default print folder we set earlier in our initial configurations.
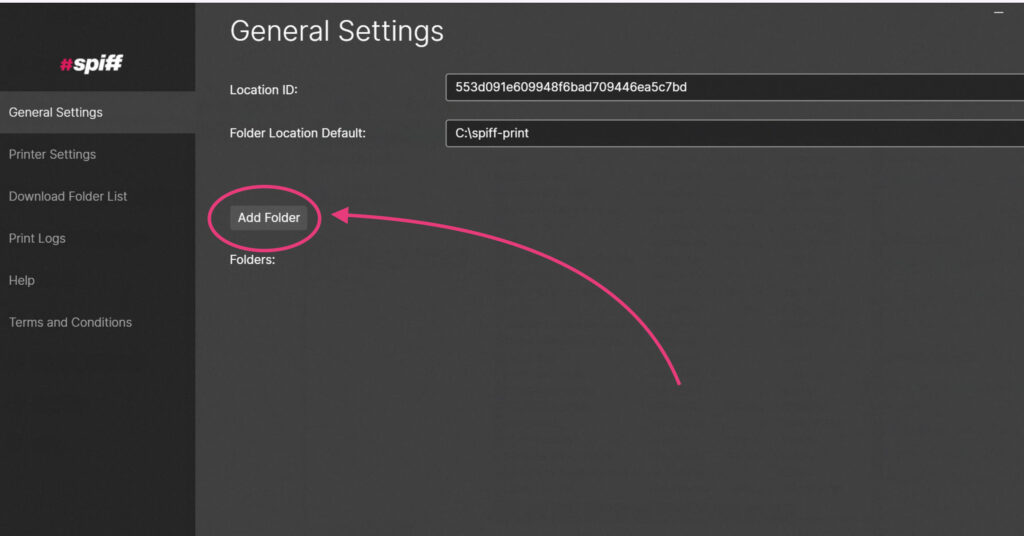
2. After creating our folders, we head back to the Spiff Print Service app, and navigate to the “General Settings” tab.
Within general settings, use the “Add folder” button to begin. See below.
3. Once we’ve clicked add folder, a prompt will pop up and we can navigate to the folders we prepared earlier, simply click on the applicable folder and then click “Select Folder” to add it to our list. Repeat the process to add any other desired folders too. As always, remember to save.
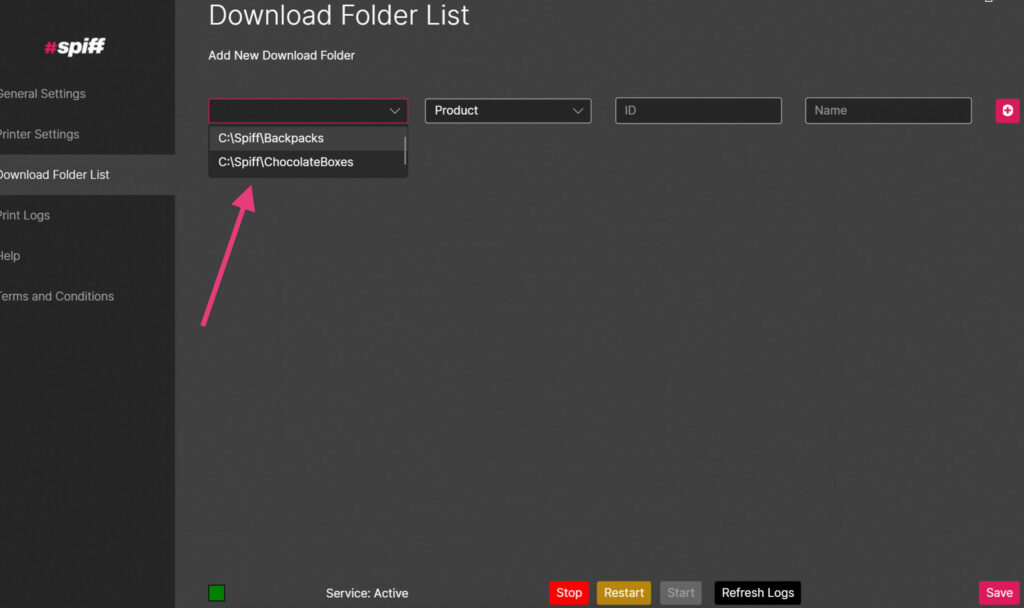
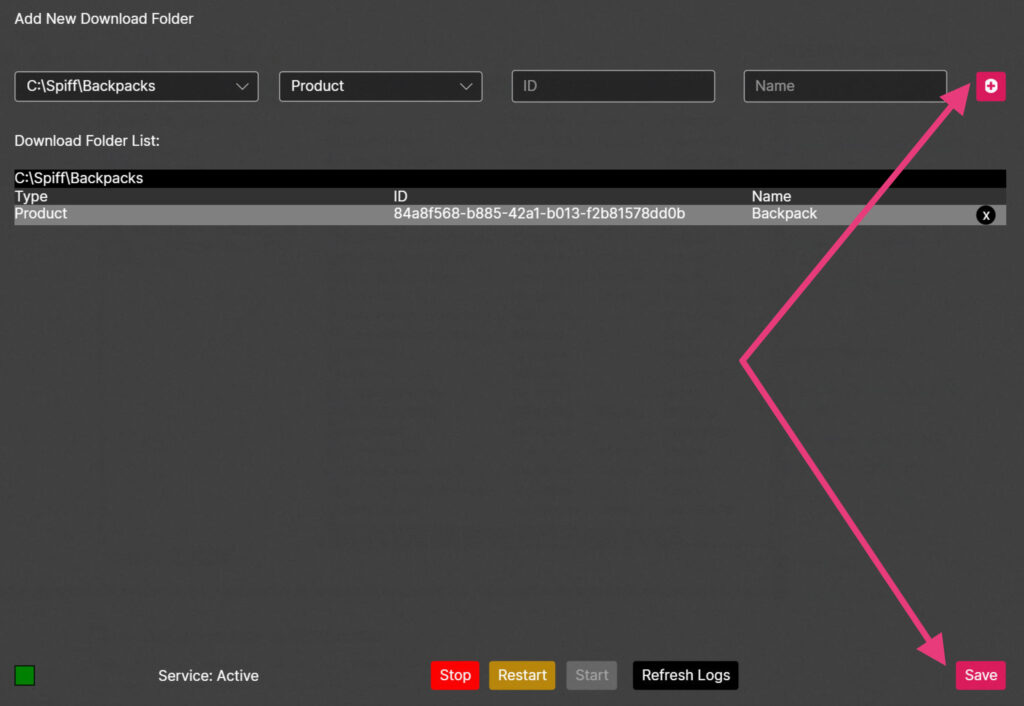
4. After adding our folders to the Spiff Print service app, we can now navigate to the “Download Folder List” tab within the app. We have a few options to link our desired products or renditions of our products to our new folders. First, we will use the dropdown to select from your folder list the appropriate folder you will link your product to.
In order to delete or remove a folder in the “General Settings tab”, it must first be unlinked from the product in the “Download Folder List” tab.
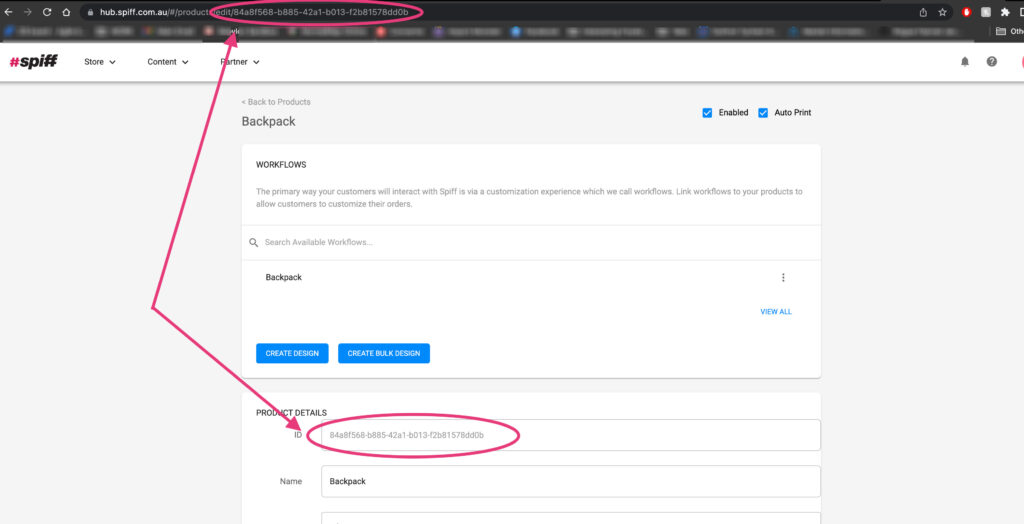
5. Now, we head back to our Product online in the Spiff Hub navigate with the top bar (Store>Products>) and find your product. Once back on the product page, you find and copy the “Product ID”. Listed in product details or can be copied from the URL of the product page. See below.
5. Back to the Spiff Print Service App now, we can take our copied Product ID, we paste this into the ID section alongside the folder we chose in the “Download Folders List” tab, in this case, make sure the “Type” in the second dropdown is set to “Product”. We then add our name in the last box, and finally, hit the pink plus Icon at the end. See below.
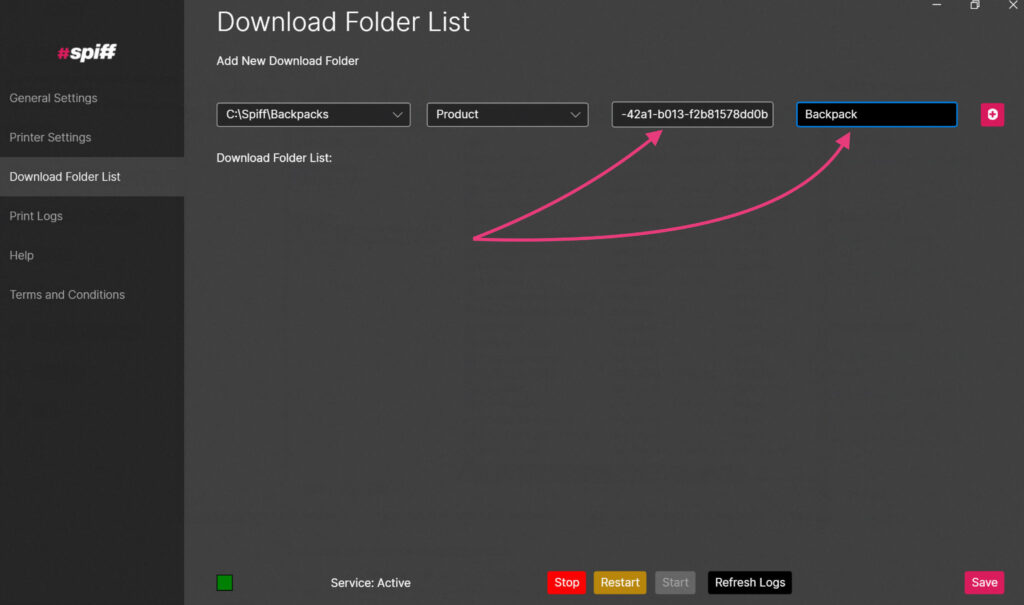
6. Now our print folder is linked to our specified product. When the customer orders this specific product, the file will automatically be routed/delivered to the folder you chose! Repeat the process for any product you need, and link to the appropriate folders. Make sure to save!
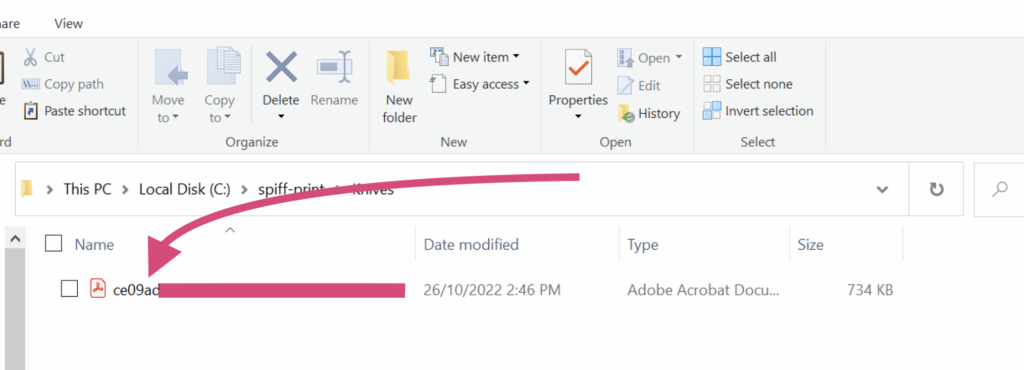
7. Finally, to test, we can repeat the process we followed earlier with Autoprint and run through a test order with the “Create Design” button on your product’s page via the Spiff Hub. Navigate through your workflow and hit add to cart, now check your folder you added and linked to see the delivered file!
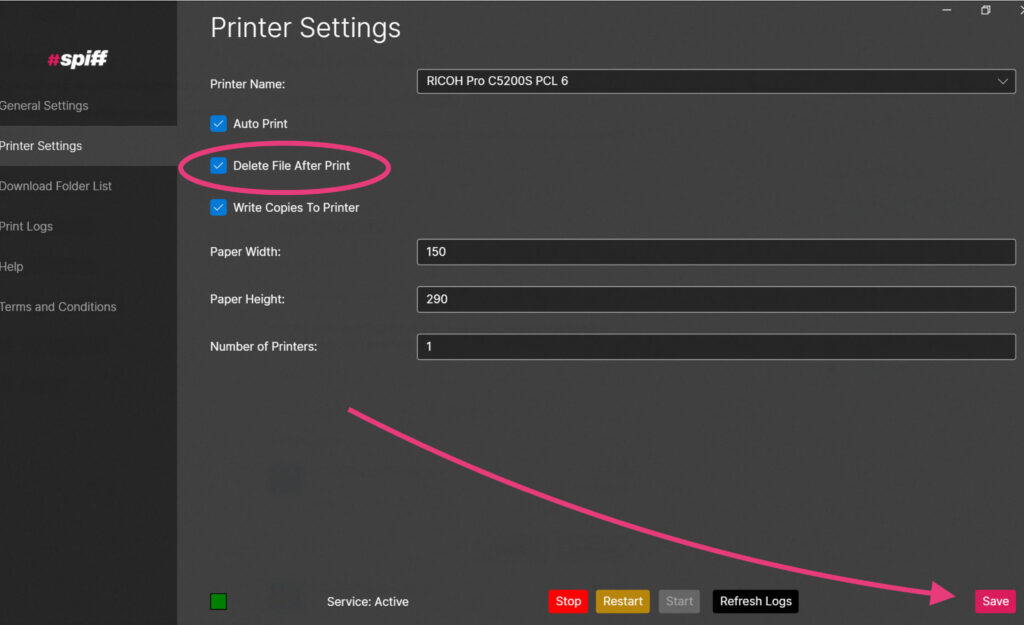
File Cleanup/Deletion
Depending on how you are running your operation, you may wish to keep your download folders clean after each print has succeeded. This keeps hard drive space down and keeps things running smoothly. You may want to keep all of the received files backed up, though within the Spiff Hub, via the orders page, any order processed through your store can be replayed and regenerated at any time, so backing up files yourself is no longer entirely necessary.
- To setup file cleanup/deletion, navigate to the “Printer Settings” tab in the Spiff Printer Service App. Simply enable the “Delete Files After Print” checkbox and the process will be enabled once you hit save.
Configuration Settings
The print server is configured with XML and is found in the App.config file. The following is an incomplete list of the configuration items that are available.
| name | value | notes |
|---|---|---|
| location | string | The id of the spiff location. This should be set from within the hub |
| doPrinting | boolean | True if the PDF needs to be sent to the preconfigured print device. You will need to make sure the printer name has been set correctly |
| productionDownloadFolder${id} | string | The path to the folder of the product that has the ID within the tag. Note this will be moved to an attribute in the future |
| printerCount | number | The number of attached printers to the current print server. These will be printed to using a round robin stragity to increase thoughput. Make sure each printier in the cluster is named ${printerName}_1, ${printName}_2 etc etc |
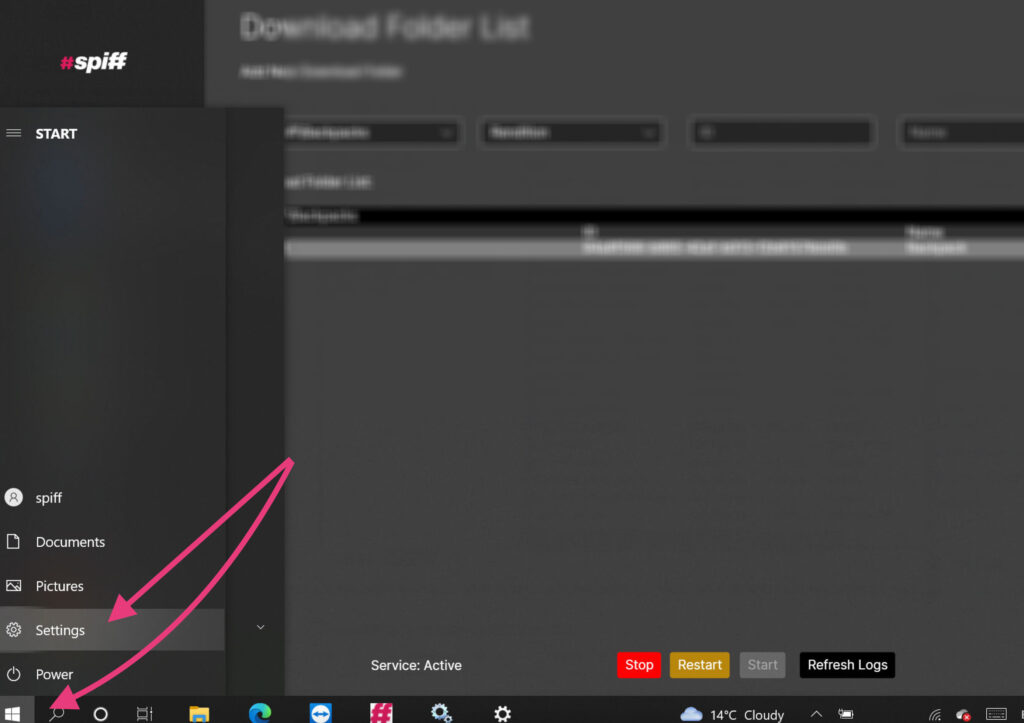
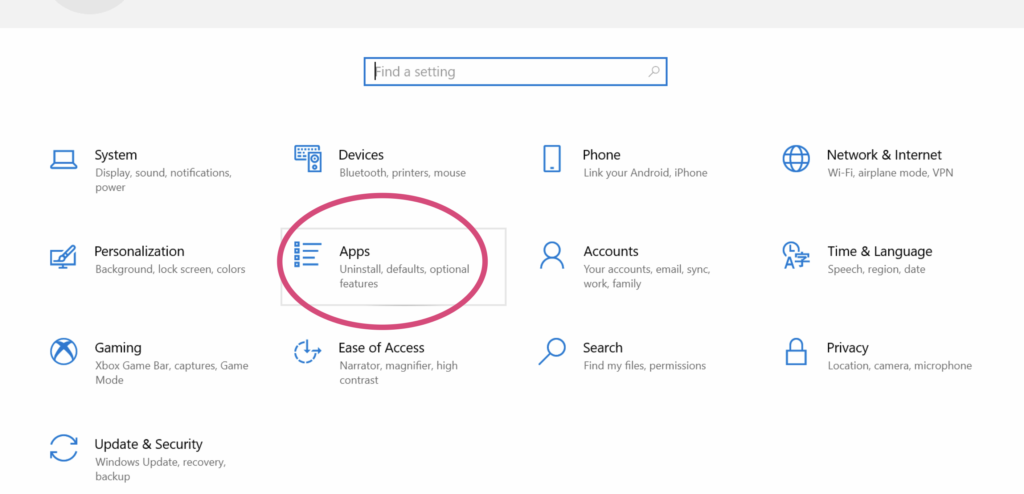
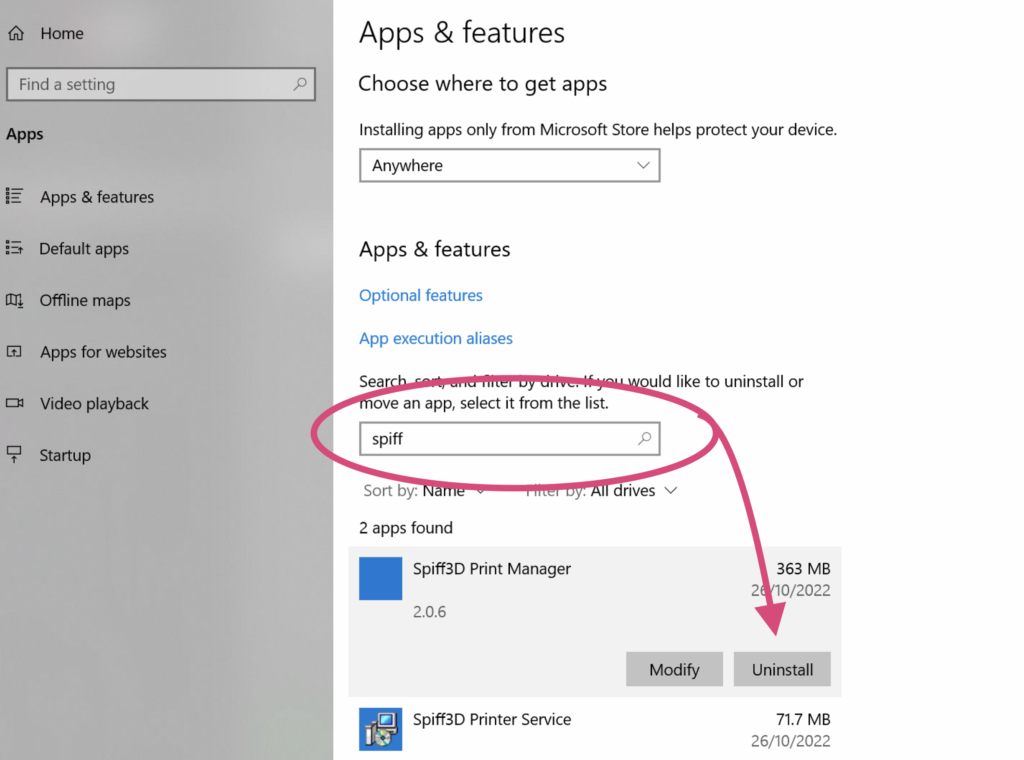
Uninstalling Apps or Programs from Windows
- First, on your windows machine, navigate to the device settings
- Once in the Settings Home page, navigate to Apps.
- In Apps, search for the app.
- Click the app, and click uninstall. Follow the prompts to correctly uninstall the service.
Refer to the below screenshots in order: